SNMP (Simple Network Management Protocol) helps monitor and manage network devices. Huawei AirEngine access points support SNMP, but in some firmware versions, by default the option is hidden in the web interface. So, we cannot Enable SNMP on Huawei AirEngine AP. In this guide I will explain how to enable SNMP using the command line.
Why Use SNMP?
SNMP simply allows network monitoring tools to collect device performance data, receive alerts through community string traps and makes easy to troubleshoot AP errors. Keep in mind you could configure SNMP on Huawei AirEngine AP Using CLI only if you are using FAT mode on your access point. Other modes like Fit or NAT do not support SNMP.
Prerequisites
Before starting, make sure your Huawei AirEngine access point running on FAT mode. If not or you are using any other model of Huawei Access Point, you must upgrade the firmware version to match the SNMP requirements. Check if your device is SSH or telnet supported.
It’s up to you if you want to use SNMPv2 or 3. So you must prepare and define SNMP community strings or SNMPv3 credentials. You also need to know your NMS (Network Management System) IP address. I am using an opensource monitoring server “LibreNMS” for example.
Enable SNMP on Huawei AirEngine AP
Step 1: Connect to the Access Point
Use a SSH client like PuTTY:
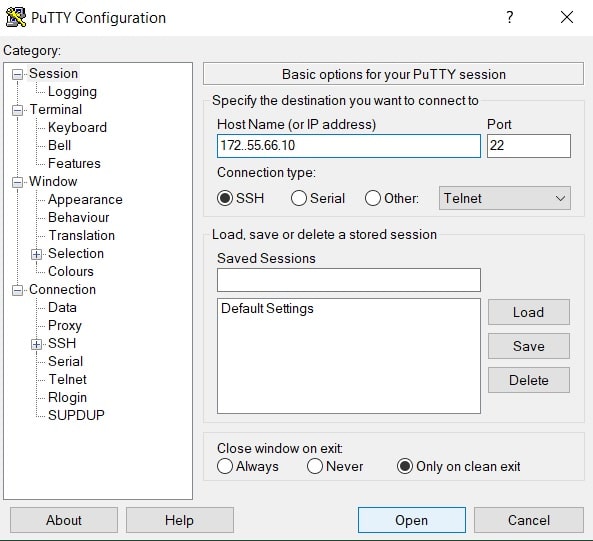
Enter the AP’s management IP. You can do it with default IP, admin user and password. But once you configured your Huawei AirEngine on FAT mode and changed the login credentials, you can assess your devices using new login credentials.
Step 2: Enter System View
After logging in, type:
system-view
This command switches to configuration mode.
Step 3: Enable SNMP Agent
Activate SNMP service using below command. This will enable SNMP service in your Access Point
snmp-agent
Step 4: Configure SNMP Community Strings
Configure SNMPv2 on your access point, so follow the commands below.
For SNMPv2c:
snmp-agent community read public
snmp-agent community write private
Replace public and private with strong custom strings. Just for example if you define SNMP string from “public” to “secure” so your command will be snmp-agent community read secure.
Step 5: Enable SNMP Traps
Traps notify your NMS about events:
snmp-agent trap enable
Step 6: Set Trap Source Interface
Choose a stable interface for trap packets:
snmp-agent trap source vlanif < Mgmt_VLAN_ID >
Replace <Mgmt_VLAN_ID> with your management VLAN ID.
For Example: snmp-agent trap source vlanif < vlan 10 >
Note: If you are using single network, instead of different networks in the same environment, don’t be confused with the wording, you can ignore this step.
Step 7: Configure Trap Parameters
Create a profile for trap settings:
snmp-agent target-host trap-paramsname nms_v2c v2c securityname public
Replace public with your own defined community string
Here:
- nms_v2c is the profile name.
- v2c is the SNMP version.
- public (your defined string) is your community string.
Step 8: Add Trap Host
Bind your NMS IP to the profile, in other words we must set a path where the logs will be generated to view. In this case, you must define the IP address of your monitoring server like LibreNMS.
snmp-agent target-host trap-hostname NMS1 address 10.10.10.50 trap-paramsname nms_v2c
Replace 10.10.10.50 with your monitoring server IP. This will tell your access point or any other network device you want to monitor, where to send all relevant data or information.
Step 9: Check SNMP settings
display snmp-agent
display snmp-agent target-host
display current-configuration | include snmp-agent
SNMPv3 Configuration (Optional)
For better security, use SNMPv3:
snmp-agent usm-user v3 snmpv3user authentication sha AuthPass123 privacy aes128 PrivPass123
snmp-agent target-host trap-paramsname nms_v3 v3 securityname snmpv3user privacy
snmp-agent target-host trap-hostname NMSv3 address 10.10.10.50 trap-paramsname nms_v3
Replace passwords with strong values you previously defined.
Common Issues and Fixes
- Command not recognized: Use the two-step method (trap-paramsname and trap-hostname).
- Traps not received: Check firewall for UDP port 162 and verify NMS IP.
- VPN instance required: Add vpn-instance <name> if NMS is in a VRF.
Key Takeaways
SNMP improves network visibility. Huawei AirEngine APs applies changes instantly so there is no need to save configurations. But still always verify configuration after changes.